
After creating a domain email for your company or business website you could check the emails by login to www.yourwebsite.com/webmail. However, this process is not always user-friendly. Most of us always use a common email at Gmail for our professional purposes. We always keep logging to Gmail on our desktops and mobile phones. So this is a best practice to link companies’ domain email accounts to Gmail.
Linking your company’s domain email account to your Gmail account is a very easy, thanks to Gmail for its user-friendly settings section. After you link your company domain Email to your Gmail, all emails coming to your server can be checked by logging in to your Gmail accounts. You can see all of your server emails in Gmail inbox. You could also reply using the same email so that your recipients will receive that email from your domain email, not your Gmail.
So below is the process:
- Log in to your Gmail account.
- Go to settings from the top right side settings icon.
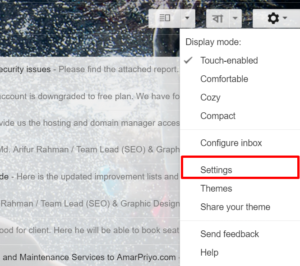
- From the settings dashboard, click on Accounts and Import. Then scroll down to check mail from other accounts. Click on Add a mail account.

- You will see a pop-up form. Now add your email account in the box, and click next.

- Check the Import emails from my other account (POP3) and click next.

- Now enter the email settings for your email. Add full email address as username, your email password, pop server: mail.yourwebsite.com (Please replace “yourwebsite.com” with your domain), port: 995. Select always use a secure connection (SSL) when retrieving email. Select Label incoming messages: if you want to see a level on the incoming and outgoing email from your domain email. Now click on Add Account. If it fails, add the password and port again and click Add Account again. (Sometimes failed to fetch the server, don’t worry.)

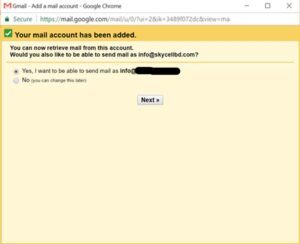
- You will see a confirmation message that your mail account has been added. Now select Yes, I want to be able to send mail to [email protected]. And click next.
- Now enter information about your other email address. Write the name that you want to see in your email. As an example, I have set MD. Arifur Rahman | Graphic Designer as name.
Check Treat as an alias and click next.
- Now configure your mail to be sent through yourwebsite.com SMTP servers. Add mail.yourwebsite.com to SMTP Server. Add full email address as Username and password for the email account, Port 465, select Secured connection using SSL. Click Add Account.

- Now check your Gmail Inbox, You will receive a verification code. Add the code and verify. You are all done.

- You are all done! You can check your email address added to Gmail from the accounts and import section.

All messages directed to your email account will be received, and you also can send emails from [email protected]. Instead of “info”, your name can be substituted, such as [email protected].
Hopefully, your email account has been successfully integrated with Gmail. If you’ve encountered any issues, don’t hesitate to pose any questions in the comments section.
Feel free to reach out to us should you require any assistance.
This site is mostly a walk-by way of for all the info you wished about this and didn’t know who to ask. Glimpse here, and you undoubtedly discover it.
I have to show my thanks to this writer for bailing me out of this particular issue. After browsing through the the web and coming across basics which are not pleasant, I believed my entire life was done. Living without the solutions to the issues you have solved through the guide is a crucial case, as well as ones that might have in a wrong way damaged my entire career if I hadn’t noticed your blog post. Your good ability and kindness in controlling every item was valuable. I’m not sure what I would’ve done if I hadn’t come upon such a thing like this. I’m able to at this time look ahead to my future. Thanks for your time so much for the skilled and effective guide. I will not hesitate to recommend your blog post to any person who would like tips about this subject.
I must express my respect for your generosity for men who have the need for assistance with this important subject. Your special dedication to getting the message up and down became remarkably invaluable and have in most cases made workers like me to reach their targets. Your amazing informative instruction denotes much a person like me and somewhat more to my office colleagues. Thank you; from everyone of us.
Hello ,
I saw your tweets and thought I will check your website. Have to say it looks really nice!
I’m also interested in this topic + have recently started my journey as young entrepreneur.
I’m also looking for the ways on how to promote my website. I have tried AdSense and Facebok Ads, however it is getting very expensive. Was thinking about starting using analytics. Do you recommend it?
Can you recommend something what works best for you?
I also want to improve SEO of my website. Would appreciate, if you can have a quick look at my website and give me an advice what I should improve: https://janzac.com/
(Recently I have added a new page about Rockwall Investments and the way how normal people can make money with this company.)
I have subscribed to your newsletter. 🙂
Hope to hear from you soon.
P.S.
Maybe I will add link to your website on my website and you will add link to my website on your website? It will improve SEO of our websites, right? What do you think?
Regards
Jan Zac